Workflow comparison

Image to Image vs Stable Diffusion: Find Your Best Fit

Image to image vs stable diffusion is not a contest between two identical tools. Image to image describes a guided editing method, while Stable Diffusion is a model ecosystem that can power that method and many other workflows.

Choose by intent

Who Each Approach Suits

The better choice depends less on the name of the tool than on how much control, repeatability, and setup your project needs.

Fast visual editors

You have a source image and want a cleaner variation, a new mood, or a different visual style without building a technical pipeline.

A simple image-to-image interface gets you from reference to draft with fewer decisions and less configuration.

image to image ai free

Technical creators

You need repeatable settings, model selection, ControlNet-style guidance, or a workflow you can inspect and adjust node by node.

Stable Diffusion gives you a deeper control surface, especially when you are comfortable managing models and parameters.

image to image comfyui

Beginners learning by doing

You want to understand the basic relationship between a source image, a prompt, and the strength of transformation.

A guided browser tool offers a shorter learning curve before you move into advanced Stable Diffusion settings.

image to image tutorial for beginners

Style and character designers

You need to preserve a pose or composition while exploring several aesthetics, outfits, environments, or lighting directions.

Either route can work, but Stable Diffusion becomes more useful when consistency and custom references matter across many iterations.

image to image ai realistic

A sensible progression

A Practical Migration Path

Start with the smallest workflow that proves your idea, then add technical control only when the project gives you a reason to.

Start with a source

Upload an image whose composition, pose, silhouette, or subject already points toward the result you want. Write a prompt that describes the changes rather than repeating every visible detail.

Tune transformation strength

Use a lower strength when structure must remain recognizable and a higher strength when you want the model to reinterpret the image more freely. Compare several nearby settings instead of changing everything at once.

Move to deeper control

If the guided workflow cannot deliver repeatable results, transfer the idea to Stable Diffusion. Add model choice, seeds, structural guidance, or a node-based interface one control at a time.
Know the trade-offs

Where Each Route Falls Short

Neither approach removes the hard parts of generative imaging. Knowing the limits helps you choose a workflow without expecting it to solve the wrong problem.

Neither route guarantees identity preservation

A source image can guide facial structure, but small details may drift between generations, especially at stronger transformation settings.

WorkaroundUse a lower transformation strength, a clear reference, consistent seeds where available, and a model suited to the subject.

Browser tools expose fewer controls

A streamlined image-to-image tool may hide model selection, samplers, seeds, masks, and structural guidance that advanced users expect.

WorkaroundUse the guided tool for exploration, then move the best prompt and reference into a Stable Diffusion interface when precision matters.

Stable Diffusion requires more setup

Local models, extensions, drivers, checkpoints, and node graphs can create friction before the first useful result appears.

WorkaroundBegin with an online workflow or a managed interface, and only install the components required by your actual project.

Text alone cannot fix a weak reference

If the source image has poor lighting, an unclear subject, or an awkward composition, adding more prompt words may not restore the missing information.

WorkaroundImprove or crop the source first, then use a targeted prompt focused on the intended transformation.

Visual proof

See the Difference in Practice

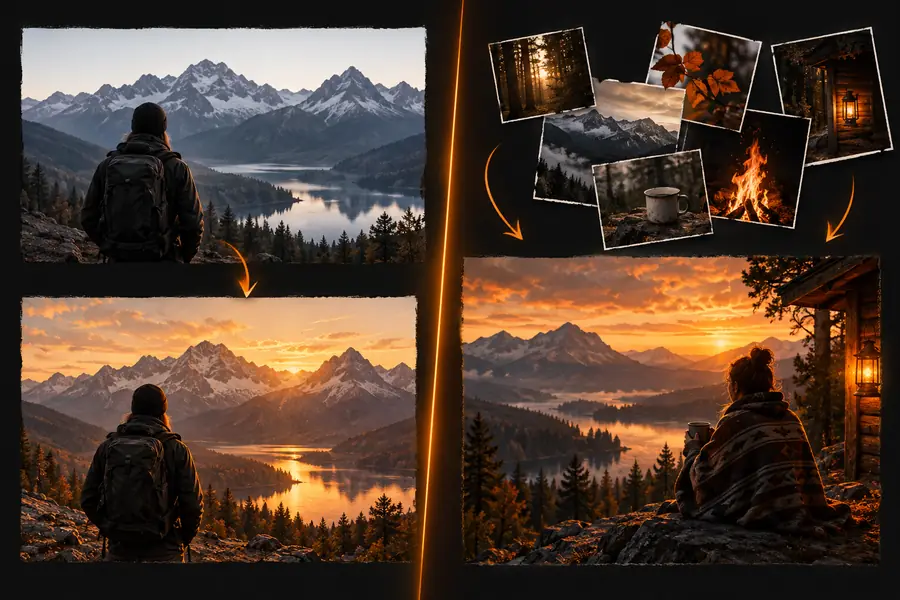
The same source can support a quick guided edit or a more deliberate technical workflow. The result depends on both the transformation goal and the controls available.

Source reference

Source image prepared for a controlled visual transformation
Realistic transformed image created from a visual reference
Transformed result

A reference guides structure; the workflow controls how far the result moves.

Side-by-side view

The Comparison at a Glance

Image to image is a workflow pattern. Stable Diffusion is a broader generation system that can perform image-to-image transformations alongside text-to-image, inpainting, outpainting, and other tasks.

Guided image to image Stable Diffusion workflow
1

What it is

Guided image to image

A focused method for transforming an existing image with a prompt.

Stable Diffusion workflow

An open model ecosystem and set of interfaces for multiple generation workflows.

2

Setup

Guided image to image

Usually upload, describe, adjust, and generate.

Stable Diffusion workflow

May involve models, checkpoints, extensions, settings, and interface configuration.

3

Creative range

Guided image to image

Best for directed variations of a reference image.

Stable Diffusion workflow

Broader range across text-to-image, image-to-image, masking, control tools, and custom pipelines.

4

Learning curve

Guided image to image

Shorter because the interface hides many technical choices.

Stable Diffusion workflow

Steeper because more parameters are visible and configurable.

5

Consistency

Guided image to image

Good for a single guided transformation, depending on the tool.

Stable Diffusion workflow

Stronger potential for repeatability through seeds, models, settings, and reusable workflows.

6

Fine-grained control

Guided image to image

Often limited to prompt, strength, aspect ratio, and a few basic options.

Stable Diffusion workflow

Can include masks, structural references, samplers, model selection, and node-level logic.

7

Best starting point

Guided image to image

Quick ideation, simple edits, and creators who want minimal friction.

Stable Diffusion workflow

Long-running projects, production systems, experimentation, and users who need technical control.

8

Main trade-off

Guided image to image

Less visibility into why a result changed.

Stable Diffusion workflow

More time spent learning, configuring, and maintaining the workflow.

Keep it simple

The Few Numbers That Matter

These practical quantities explain why people often begin with a focused workflow and expand only when the project demands more control.

The basic image-to-image workflow begins with a visual reference.
1 source image
A browser-based route can avoid local model and interface installation.
0 required installs
Most guided transformations start with a source image and a text direction.
2 core inputs
Move to Stable Diffusion when repeatability or deeper controls become necessary.
1 next step

Ready to test

Move From Comparison to Creation

You do not need to choose a permanent side before making a useful image. Start with a source, test the transformation you actually need, and move to a deeper Stable Diffusion workflow only if the first route leaves an important control out.

  • Start from an image you already understand
  • Compare subtle and bold transformations
  • Keep the prompt focused on the change you want

Common questions

Image to Image vs Stable Diffusion FAQ

No. Image to image is a generation method that uses an existing image as guidance, while Stable Diffusion is a model ecosystem that can support image to image and several other workflows. A Stable Diffusion interface may therefore include image to image as one of many features.

A focused image-to-image tool is usually easier because it presents fewer settings and handles more of the technical setup for you. Stable Diffusion offers more control, but that flexibility also means learning about models, strength settings, seeds, samplers, and sometimes extensions.

Not automatically. Stable Diffusion can provide more control over models, structure, masks, and repeatability, but a simpler tool may produce a better result faster for a straightforward edit. The best outcome depends on the source image, prompt, model, and settings.

That is a practical path for many creators. A guided workflow lets you learn how source images, prompts, and transformation strength interact before adding the extra decisions found in a full Stable Diffusion setup.

It can preserve major elements such as pose, layout, or silhouette when the transformation strength is controlled carefully. Preservation is not guaranteed, though, and complex details may change as the requested style or subject transformation becomes stronger.

Start creating
Start creating